

As an Amazon Associate, Craftylife Boutique earns from qualifying purchases. Links below may be affiliate links, which means we may earn a small commission at no extra cost to you. We only recommend gear we’d actually use.
If your machine embroidery keeps puckering, shifting, or looking a little “off,” there’s a good chance the culprit isn’t your machine or your design — it’s your stabilizer. And figuring out what stabilizer to use for machine embroidery is hands-down the most confusing part of getting started. Cut-away, tear-away, wash-away, mesh, fusible, sticky… it’s a lot.
So here’s the whole thing in one sentence, and then we’ll break it down: match your stabilizer to your fabric — cut-away for anything stretchy, tear-away for anything stable, and wash-away for anything you don’t want it to show through. That’s 90% of it. Now the details.
Why stabilizer matters so much
Stabilizer is the backing that holds your fabric steady while thousands of stitches go in. Without the right support, the fabric shifts and the stitches pull it in — and that’s exactly what puckering is. Pick the right stabilizer and hoop it drum-tight, and you’ve solved the most common beginner problem before it happens.
The 3 stabilizers you actually need to know
1. Cut-Away — for stretchy & unstable fabrics
Use it on: t-shirts, knits, sweatshirts, baby clothes, towels, anything with stretch or a loose weave. Why: cut-away is the most supportive type — it stays behind your design permanently and keeps stretchy fabric from moving now and after every wash. You trim away the excess with scissors and leave the rest.
If you only buy one stabilizer to start, make it a medium-weight cut-away — it’s the safest choice for apparel. For lightweight or sheer knits, a no-show mesh cut-away is softer and won’t show through from the front.
👉 Shop cut-away stabilizer on Amazon · 👉 Shop no-show mesh cut-away
2. Tear-Away — for stable, woven fabrics
Use it on: quilting cotton, canvas, tote bags, tea towels, twill, denim — anything that doesn’t stretch. Why: stable fabric doesn’t need permanent support, so tear-away lets you gently tear the excess away after stitching for a clean finish and a softer feel. Easy and quick — just don’t use it on knits, or your design will pull.
👉 Shop tear-away stabilizer on Amazon
3. Wash-Away (Water-Soluble) — for sheer fabric, lace & toppings
Use it two ways: as a backing for sheer fabrics and free-standing lace (it dissolves completely in water, leaving no trace), or as a topping laid on top of textured fabrics like towels and fleece so your stitches sit up crisp instead of sinking into the pile. If your letters keep disappearing into a towel, wash-away topping is your fix.
👉 Shop wash-away stabilizer on Amazon · 👉 Shop water-soluble topping
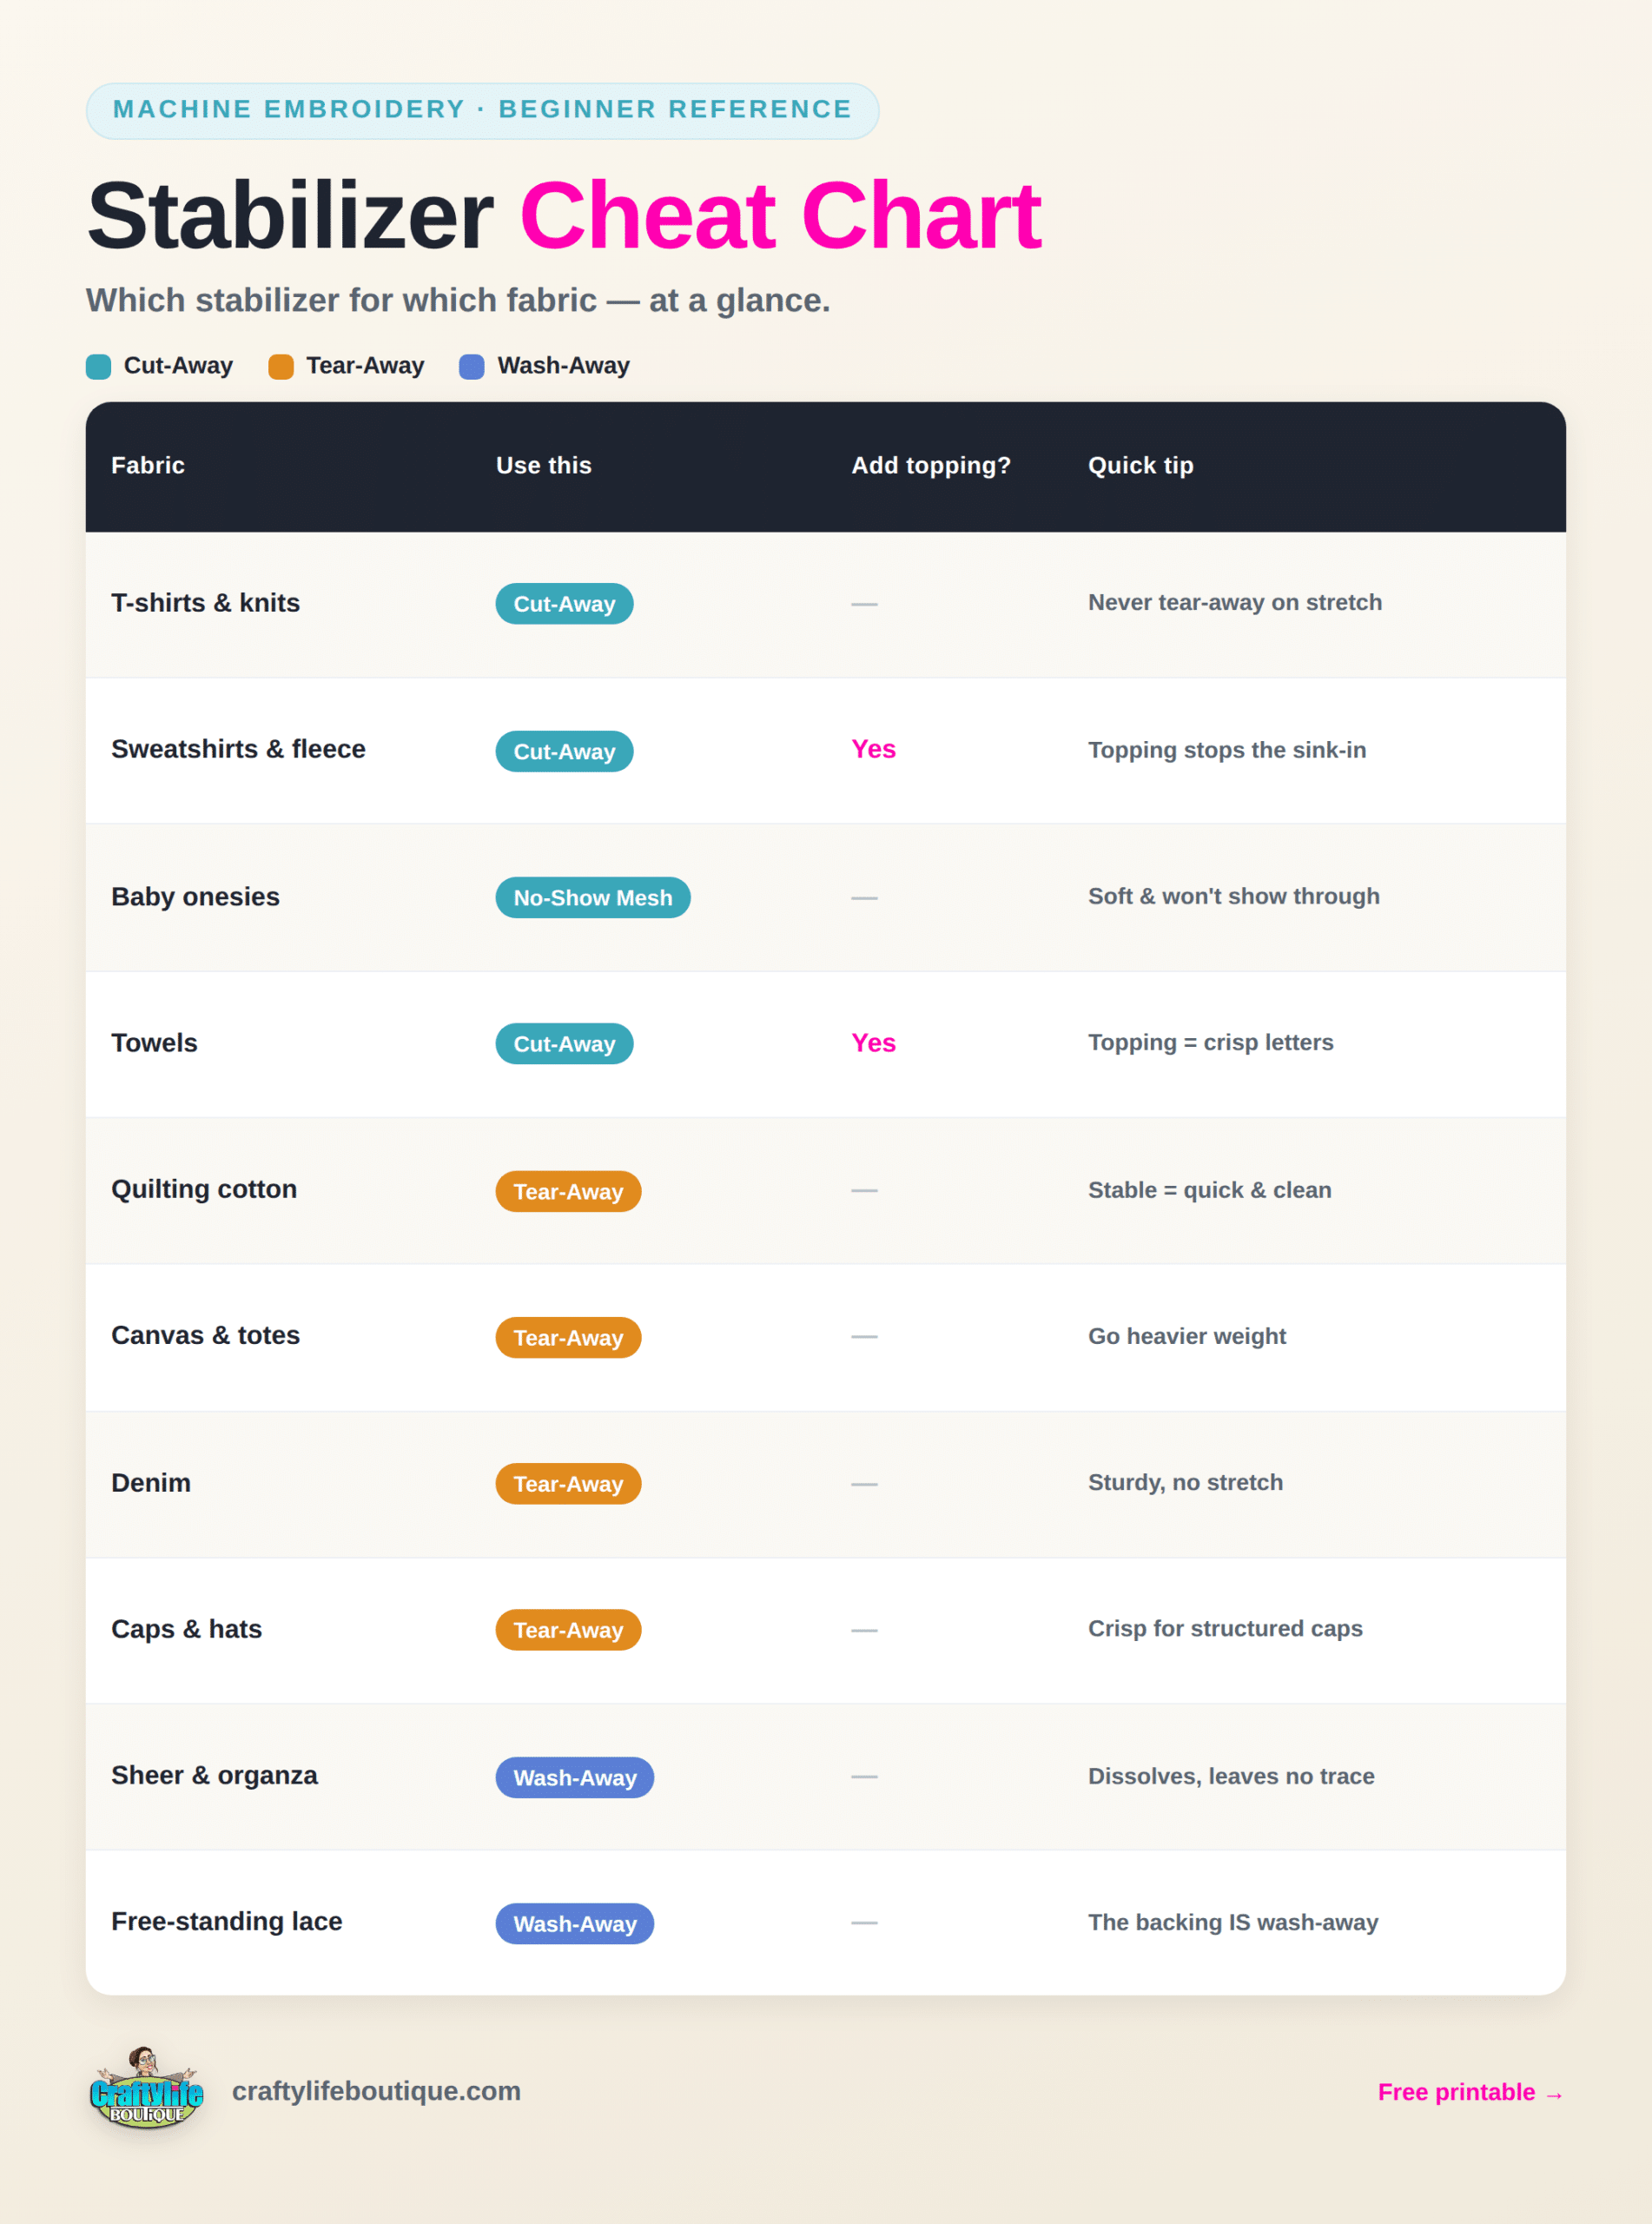
Your stabilizer cheat chart
Print this and tape it by your machine — it answers “which one?” at a glance. (Grab the free full-size printable at the bottom of this post.)
A quick word on weight
Stabilizers come in weights (light, medium, heavy). Simple rule: the denser your design and the stretchier your fabric, the heavier the stabilizer you need. When in doubt on apparel, reach for a medium cut-away — and remember you can always add a second layer of light stabilizer rather than fighting one that’s too stiff.
The 3 mistakes beginners make
Using tear-away on a t-shirt. It doesn’t support the stretch, and the design distorts. Cut-away on knits, always.
Skipping topping on towels. Your design sinks. A layer of wash-away on top keeps it crisp.
Assuming fusible is “support.” Fusible (iron-on) stabilizer is great for holding fabric in place, but it’s usually not enough support on its own for a dense design — pair it with a cut-away underneath.
Free printable: The Stabilizer Cheat Sheet
Want the full breakdown — every fabric, every stabilizer, plus weights and hooping tips — in one printable? Grab our free Stabilizer Workbook. Save it, print it, keep it by your machine.
👉 Download the free Stabilizer Workbook
Start simple
You don’t need a shelf full of stabilizers to start — a medium cut-away and a tear-away will handle almost everything a beginner stitches, and you can add mesh and wash-away as you branch out. Get those two, match them to your fabric, hoop tight, and you’ve beaten the #1 thing that trips people up.
Still fighting a specific fabric? Tell us what you’re stitching in the comments — we’ve probably stabilized it. And if you’d rather hand off the tricky part, we hand-digitize designs built to stitch clean the first time. 🧵